Spirit Slasher (talk | contribs) No edit summary Tag: Visual edit |
|||
| (28 intermediate revisions by 2 users not shown) | |||
| Line 1: | Line 1: | ||
| + | This page serves as a basic '''how to play guide for ''{{Gamename}}'''''. |
||
| − | {{Stub}} |
||
| − | This page will serve as a basic '''how to play guide for ''{{Gamename}}'''''. While there is very little information available at this time, we urge you to check back often, as new information is being added all the time! Feel free to edit this guide with any tips, tricks, and suggestions. |
||
==Basic gameplay== |
==Basic gameplay== |
||
| − | When you select Ride from the main menu, you are presented with |
+ | When you select Ride from the main menu, you are presented with 6 options: Career Session, Career-Plus Session, Freeride, Daily Challenge, Multiplayer Lobby, and Bike Parks. |
| + | |||
| + | {{noplatform|noxbox}}{{noplatform|nops4}}{{noplatform|noswitch}}For the Steam version only, before selecting Ride, there is an additional menu option entitled "Mods". |
||
===Career Session=== |
===Career Session=== |
||
| Line 9: | Line 10: | ||
Career Session will allow you to pick your choice of starting location: [[Highlands]], [[Forest]], [[Canyon]], or [[Peaks]]. The shortcuts to the last 3 zones have to be unlocked first. |
Career Session will allow you to pick your choice of starting location: [[Highlands]], [[Forest]], [[Canyon]], or [[Peaks]]. The shortcuts to the last 3 zones have to be unlocked first. |
||
| − | Regardless of starting location, the player will always start with a Basic Setup level (a 4-4-4 Steepness-Curves-Stunts rating, except for the [[Volcano]], where Stunts is replaced by Tectonics). The goal of each level is to bike to the finish line. After completing the level, the player will be presented with a world map of the current region, from which they can choose the next track/node that they would like to complete. All tracks are procedurally-generated by the game. |
+ | Regardless of starting location, the player will always start with a Basic Setup level (a 4-4-4 Steepness-Curves-Stunts rating, except for the [[Volcano]], where Stunts is replaced by Tectonics). The goal of each level is to bike to the finish line. After completing the level, the player will be presented with a world map of the current region, from which they can choose the next track/node that they would like to complete. All tracks are procedurally-generated by the game. Every node will remain accessible on the map; the player is not locked out of completing them, but they still have to complete an adjacent node to be able to play their target node. To complete a region, the player should navigate through the nodes to the Boss Jump node, and then complete that node. In order to perform a "speed run", ignore all other nodes, and ''only'' complete the ones that lead to the Boss Jump. |
While the game generates the track, it also assesses the generated track and randomly picks a bonus objective that can be achieved on that track. Completing the bonus objective will yield 1 life. |
While the game generates the track, it also assesses the generated track and randomly picks a bonus objective that can be achieved on that track. Completing the bonus objective will yield 1 life. |
||
| − | There are always special nodes in each region: a Danger Zone, where the player can earn more rep but lose double the health from bails; a Medic Camp, where the player earns 1 life from completing the node; a Helmet Cam, where the player is |
+ | There are always special nodes in each region: a '''<u>Danger Zone</u>''', where the player can earn more rep but lose double the health from bails; a '''<u>Medic Camp</u>''', where the player earns 1 life from completing the node itself and 1 more for completing the bonus objective; a '''<u>Helmet Cam</u>''', where the player is locked into first-person view and cannot switch out of it until the track is done (but earn more rep for their troubles); a '''<u>Team Node</u>''', where the player can pick a team for a node appropriate to the team picked; and a '''<u>Fire Node</u>''', which offers a lot of challenge (an 8-8-8 level rating), and changes the Boss Jump node to a fire ring variant upon completion. Each region also has a special handcrafted node called a [[Bonus World]]. |
| − | In any region, the first 7 nodes will be in daylight conditions (unless modifiers change the weather). Following that, 2 nodes will be in dusk conditions, and the rest will be in nighttime conditions, with the bike's headlight continuing to lose battery power for 2 nodes until it dies on the third node since nightfall. Should nighttime fall, daylight will only return once the player moves to the next region. |
+ | In any region, the first 7 nodes will be in daylight conditions (unless modifiers change the weather). Following that, 2 nodes will be in dusk conditions, and the rest will be in nighttime conditions, with the bike's headlight continuing to lose battery power for 2 nodes until it dies on the third node since nightfall. Should nighttime fall, daylight will only return once the player moves to the next region. Some regions are easier despite nightfall, for example, the [[Desert]] is a very open place with few obstacles, so the moonlight is actually ''helping'' the player rather than being a hindrance. The [[Highlands]] and [[Forest]], on the other hand, naturally have trees that block the player's view, which makes them much harder. It is because of this deteriorating light conditions that you should unlock the Boss Jump as soon as possible, and ignore all other nodes unless you are specifically attempting to earn more rep, more lives, or some other reward. |
| − | The player should try to do as many tricks as possible in order to earn Rep. There are diminishing returns for repeating the same tricks over and over. The amount of Rep earned during a run will determine the type of item that a player may receive following the conclusion of a run (whether it be by getting rekt, retiring from a session, or completing the Peaks/Volcano boss jump); see [[Items#Normal Skins|here]] for a full list of items in this category. |
+ | The player should try to do as many tricks as possible in order to earn Rep. There are diminishing returns for repeating the same tricks over and over. The amount of Rep earned during a run will determine the type of item that a player may receive following the conclusion of a run (whether it be by getting "rekt", retiring from a session, or completing the Peaks/Volcano boss jump); see [[Items#Normal Skins|here]] for a full list of items in this category. |
| + | |||
| + | As of full release, it is possible to see other players currently riding the same node that you are riding, due to the nature of how runs are generated (every few minutes the run seed globally changes). |
||
| + | |||
| + | ===Career-Plus Session=== |
||
| + | {{main|Career-Plus}} |
||
| + | Career-Plus functions similarly to Career in most aspects, but differs in a few: |
||
| + | *There are 4 new regions - [[Desert]], [[Jungle]], [[Favela]], and [[Glaciers]] |
||
| + | **There is a secret 5th region, the [[Ridges]], accessible in the same manner as the Volcano. |
||
| + | *The mode requires the player to have earned 100,000 Reputation. |
||
| + | *There are no Team Nodes and no possibility of the game generating stormy or no-path nodes. (It is however possible to brute-force the game to generate them by modifying the [[Seed]].) |
||
| + | |||
| + | Like Career, shortcuts to the last 3 regions have to be unlocked first. Unlike Career, there are no bonus worlds and no secret fifth region. |
||
===Freeride=== |
===Freeride=== |
||
| Line 23: | Line 36: | ||
The player can enter any seed from any region; however, to generate levels in-game from a specific region, the player will need to unlock the shortcut to that region first. The Volcano is the only exception; its seeds cannot be entered and levels cannot be generated in-game until the player has cleared the Volcano boss jump. |
The player can enter any seed from any region; however, to generate levels in-game from a specific region, the player will need to unlock the shortcut to that region first. The Volcano is the only exception; its seeds cannot be entered and levels cannot be generated in-game until the player has cleared the Volcano boss jump. |
||
| + | |||
| + | For [[Bonus World]]s, they can be selected via the menu option if their objective was completed during a Career mode run; otherwise, the only way to play them is by inputting their seed. |
||
The player can add as many [[Crew Members]] as they want to the in-game generator; however, they can only add crew members that they have previously selected in Career, and only crew members with a yellow icon will be reflected in the seed. |
The player can add as many [[Crew Members]] as they want to the in-game generator; however, they can only add crew members that they have previously selected in Career, and only crew members with a yellow icon will be reflected in the seed. |
||
| Line 28: | Line 43: | ||
===Daily Challenge=== |
===Daily Challenge=== |
||
Daily Challenge works the same way as Career Session, except that this may only be attempted once, with every player in the world getting the same session. A new session begins at 00:00 GMT daily. |
Daily Challenge works the same way as Career Session, except that this may only be attempted once, with every player in the world getting the same session. A new session begins at 00:00 GMT daily. |
||
| + | |||
| + | ===Multiplayer=== |
||
| + | {{main|Multiplayer}} |
||
| + | Added upon launch, Multiplayer allows the player to see other players in-game, host lobbies, and join other players' lobbies. |
||
| + | |||
| + | ===Bike Parks=== |
||
| + | {{main|Bike Park}} |
||
| + | Bike Parks are a curated series of handcrafted modded maps, mostly created by Descenders' map designers Roan Albers and Spe. |
||
| + | |||
| + | ===Mods{{noplatform|noxbox}}{{noplatform|nops4}}{{noplatform|noswitch}}=== |
||
| + | {{main|Mods}} |
||
| + | Mods are a series of handcrafted modded maps, designed by the mapmaking community. |
||
==Controls== |
==Controls== |
||
| − | These are the |
+ | These are the bindings for Descenders. Only keyboard bindings are re-bindable. All bindings can be viewed in-game in the options menu, and are reproduced here to serve as an external resource. |
| + | |||
| ⚫ | |||
| + | [[File:gameplaycontrols.jpg|400px]]<br> |
||
| + | [[File:otherbindings.jpg|400px]] |
||
| + | |||
| + | These are the bindings for the PS4 version: |
||
| + | |||
| + | [[File:PS4.jpg|400px]] |
||
| + | |||
| + | These are the bindings for the Switch version: |
||
| + | |||
| + | [[File:switchcontrols1.jpg|400px]]<br> |
||
| + | [[File:switchcontrols2.jpg|400px]] |
||
| + | |||
| + | {{main|Tricks}} |
||
| + | There are 5 types of tricks that can be done by pressing C (on keyboard), LB (on Xbox controller), or L1 (on PlayStation controller) - the directions listed indicate the direction in which to press the key/move the stick. For a full list, refer to the above page. |
||
| + | Not listed in the bindings in-game are the binds to use the handlebar item or say "Hey" (which can be toggled in the options menu). To do that, press "A" (keyboard)/press on the right stick (Xbox/PS4 controller/Switch). |
||
| ⚫ | |||
| − | == |
+ | ==General strategies== |
*Try and get used to the control scheme instead of focusing on Rep gain. The more control you have over your bike, the more Rep you will typically gain anyway. |
*Try and get used to the control scheme instead of focusing on Rep gain. The more control you have over your bike, the more Rep you will typically gain anyway. |
||
| + | *Play around with the camera view. Some points of view make the game ''easier'' on certain maps or modes, while others make it harder. For example, the First person view cam is ''absolutely'' horrible. Generally speaking, the best camera view is with the Drone, which gives you a third-person view and allows you to pre-empt incoming obstacles. However, in certain conditions First person view may actually help you, for example in a nighttime track. |
||
*Not all [[Crew Members|crew members]] are equally useful. Here is a chart by Gardalice, sorting the crew members into various tiers with explanations, and this rule of thumb can be followed for both rep-gain and regular play. This isn't a be-all and end-all guide, due to everyone's differing playstyles, but it is useful if you want to improve your modifier selection. |
*Not all [[Crew Members|crew members]] are equally useful. Here is a chart by Gardalice, sorting the crew members into various tiers with explanations, and this rule of thumb can be followed for both rep-gain and regular play. This isn't a be-all and end-all guide, due to everyone's differing playstyles, but it is useful if you want to improve your modifier selection. |
||
| Line 43: | Line 87: | ||
! Crew Member !! Tier !! Explanation |
! Crew Member !! Tier !! Explanation |
||
|- |
|- |
||
| − | | Landing Impact || S (Priority for Survivability) || One of the most important crew members to have |
+ | | Landing Impact || S (Priority for Survivability) || One of the most important crew members to have, which increases the amount of force your bike can take before bailing; combining with Pump Strength (or even just normal counter-pumping) allows you to survive jumps that you might normally bail from otherwise. |
|- |
|- |
||
| − | | Fewer Obstacles || S || Less clutter, more chances to steer away from danger when going offroad. Don't you just hate all those rocks? Increases load time slightly, but that's a minor trade-off. |
+ | | Fewer Obstacles || S || Less clutter, more chances to steer away from danger when going offroad. (Don't you just hate all those rocks?) Increases load time slightly, but that's a minor trade-off. |
|- |
|- |
||
| − | | Speed Wobbles || S || |
+ | | Speed Wobbles || S || Allows you to go faster without being thrown off course due to the micro-adjustments from the terrain. Great for lining up boss jumps, off-road maps, and just accelerating in general. It's easier to complete bonus objectives that require you to achieve a certain top speed with this crew member. |
|- |
|- |
||
| − | | Prevent Modifiers || S || Where's The Path modifiers on Canyon and Peaks can be incredibly dangerous; this prevents them outright. |
+ | | Prevent Modifiers || S in [[Career]], Garbage in [[Career-Plus]] || Where's The Path modifiers on Canyon and Peaks can be incredibly dangerous; this prevents them outright. On Career-Plus, there are no storm or no-path nodes. |
|- |
|- |
||
| In Air Correction || A (Rep gain and maintaining speed) || Straightens your bike out faster, potentially saving you if your jump angle is awkward - especially if you do berm jumps. |
| In Air Correction || A (Rep gain and maintaining speed) || Straightens your bike out faster, potentially saving you if your jump angle is awkward - especially if you do berm jumps. |
||
| Line 57: | Line 101: | ||
| Spin Speed || A || Makes longer spin tricks like double backflip or 720 easier/faster to perform, yielding more Rep. |
| Spin Speed || A || Makes longer spin tricks like double backflip or 720 easier/faster to perform, yielding more Rep. |
||
|- |
|- |
||
| − | | Tweak Speed || A || Not great on its own, but when combined with Spin Speed it becomes A-tier, as it allows for faster acceleration on spins. With enough speed, 1080s on regular jumps become possible |
+ | | Tweak Speed || A || Not great on its own, but when combined with Spin Speed it becomes A-tier, as it allows for faster acceleration on spins. With enough speed, 1080s on regular jumps even become possible! |
|- |
|- |
||
| Smoother Curves || A || Straightens the curves and makes it easier to go fast. Combines well with Speed Wobbles and Extra Steepness, and also stacks with Less Curves. |
| Smoother Curves || A || Straightens the curves and makes it easier to go fast. Combines well with Speed Wobbles and Extra Steepness, and also stacks with Less Curves. |
||
| Line 65: | Line 109: | ||
| Pump Strength || S with Landing Impact, A otherwise || Increases counter-pumping's potency by a bit. When combined with Landing Impact, allows you to survive huge jumps with ease if counter-pumping is timed right. On its own, helps you to build up speed when you slow down too much, maintaining your multiplier. |
| Pump Strength || S with Landing Impact, A otherwise || Increases counter-pumping's potency by a bit. When combined with Landing Impact, allows you to survive huge jumps with ease if counter-pumping is timed right. On its own, helps you to build up speed when you slow down too much, maintaining your multiplier. |
||
|- |
|- |
||
| − | | Wider Path || B (Optional modifiers)|| Makes berms and curves higher, and is good up to the Canyon. On Peaks, this does not stack well with high steepness and curves levels, |
+ | | Wider Path || B (Optional modifiers)|| Makes berms and curves higher, and is good up to the Canyon. On Peaks, this does ''not'' stack well with high steepness and curves levels, since the map may have a curve on a steep downhill section which can be dangerous to safely navigate. However, it ''does'' stack well with Less Curves/Smoother Curves, if combined with Extra Steepness. |
|- |
|- |
||
| − | | Extra Steepness || B || Good for going fast and racking up high speed points. However, this does not stack well with Wider Path on Peaks. With Smoother Curves/Less Curves, this can result in insanely fast levels if the level has a Curves rating of 3-4. |
+ | | Extra Steepness || B || Good for going fast and racking up high speed points. However, this does ''not'' stack well with Wider Path on Peaks. With Smoother Curves/Less Curves, this can result in insanely fast levels if the level has a Curves rating of 3-4. |
|- |
|- |
||
| Off-Road Friction || C (Technical) || Good for maintaining speed when off-road, but can be tricky to utilise. Great for speedruns where you just ignore the track and cycle as the crow flies. Stacks well with Extra Steepness, but is only really useful in Highlands and Forest, as going off-road on Canyon and Peaks is often a death sentence. |
| Off-Road Friction || C (Technical) || Good for maintaining speed when off-road, but can be tricky to utilise. Great for speedruns where you just ignore the track and cycle as the crow flies. Stacks well with Extra Steepness, but is only really useful in Highlands and Forest, as going off-road on Canyon and Peaks is often a death sentence. |
||
|- |
|- |
||
| − | | Fakie Balance || C || For |
+ | | Fakie Balance || C || For beginning players, this is useful to save yourself when you accidentally find yourself biking backwards and need to jump + 180 to save yourself. For experienced players who are used to the default fakie controls, this helps them rack up big points easier. In terms of survivability though, this isn't that useful in the long run, as riding Canyon and Peaks backwards can prove to be fast and curvy. |
|- |
|- |
||
| Wheelie Balance || C || Increases the threshold for tipping over, meaning that you can stoppie non-stop while descending the Peaks. Wheelies themselves aren't great, but can still help you maintain your multiplier. |
| Wheelie Balance || C || Increases the threshold for tipping over, meaning that you can stoppie non-stop while descending the Peaks. Wheelies themselves aren't great, but can still help you maintain your multiplier. |
||
|- |
|- |
||
| − | | More Team Nodes || D (Daily) || This crew member only comes into effect next world, so ideally it is best acquired when you are in the Highlands. Can help with daily challenges requiring max steepness tracks, minibosses, or rival sponsor nodes. Stacks well with Scout Nodes, making them easier to find. |
+ | | More Team Nodes || D (Daily) in [[Career]], Garbage in [[Career-Plus]] || This crew member only comes into effect next world, so ideally it is best acquired when you are in the Highlands. Can help with daily challenges requiring max steepness tracks, minibosses, or rival sponsor nodes. Stacks well with Scout Nodes, making them easier to find. Team Nodes do not exist in Career-Plus. |
|- |
|- |
||
| Scout Nodes || D || Only good for finding bonus nodes easier, whether to beat them (Medic Camp, Team Node, Fire Node) or avoid certain ones (Helmet Cam). Stacks well with More Team Nodes. |
| Scout Nodes || D || Only good for finding bonus nodes easier, whether to beat them (Medic Camp, Team Node, Fire Node) or avoid certain ones (Helmet Cam). Stacks well with More Team Nodes. |
||
Revision as of 23:17, 27 November 2021
This page serves as a basic how to play guide for Descenders.
Basic gameplay
When you select Ride from the main menu, you are presented with 6 options: Career Session, Career-Plus Session, Freeride, Daily Challenge, Multiplayer Lobby, and Bike Parks.
![]()
![]()
![]() For the Steam version only, before selecting Ride, there is an additional menu option entitled "Mods".
For the Steam version only, before selecting Ride, there is an additional menu option entitled "Mods".
Career Session
Career Session will allow you to pick your choice of starting location: Highlands, Forest, Canyon, or Peaks. The shortcuts to the last 3 zones have to be unlocked first.
Regardless of starting location, the player will always start with a Basic Setup level (a 4-4-4 Steepness-Curves-Stunts rating, except for the Volcano, where Stunts is replaced by Tectonics). The goal of each level is to bike to the finish line. After completing the level, the player will be presented with a world map of the current region, from which they can choose the next track/node that they would like to complete. All tracks are procedurally-generated by the game. Every node will remain accessible on the map; the player is not locked out of completing them, but they still have to complete an adjacent node to be able to play their target node. To complete a region, the player should navigate through the nodes to the Boss Jump node, and then complete that node. In order to perform a "speed run", ignore all other nodes, and only complete the ones that lead to the Boss Jump.
While the game generates the track, it also assesses the generated track and randomly picks a bonus objective that can be achieved on that track. Completing the bonus objective will yield 1 life.
There are always special nodes in each region: a Danger Zone, where the player can earn more rep but lose double the health from bails; a Medic Camp, where the player earns 1 life from completing the node itself and 1 more for completing the bonus objective; a Helmet Cam, where the player is locked into first-person view and cannot switch out of it until the track is done (but earn more rep for their troubles); a Team Node, where the player can pick a team for a node appropriate to the team picked; and a Fire Node, which offers a lot of challenge (an 8-8-8 level rating), and changes the Boss Jump node to a fire ring variant upon completion. Each region also has a special handcrafted node called a Bonus World.
In any region, the first 7 nodes will be in daylight conditions (unless modifiers change the weather). Following that, 2 nodes will be in dusk conditions, and the rest will be in nighttime conditions, with the bike's headlight continuing to lose battery power for 2 nodes until it dies on the third node since nightfall. Should nighttime fall, daylight will only return once the player moves to the next region. Some regions are easier despite nightfall, for example, the Desert is a very open place with few obstacles, so the moonlight is actually helping the player rather than being a hindrance. The Highlands and Forest, on the other hand, naturally have trees that block the player's view, which makes them much harder. It is because of this deteriorating light conditions that you should unlock the Boss Jump as soon as possible, and ignore all other nodes unless you are specifically attempting to earn more rep, more lives, or some other reward.
The player should try to do as many tricks as possible in order to earn Rep. There are diminishing returns for repeating the same tricks over and over. The amount of Rep earned during a run will determine the type of item that a player may receive following the conclusion of a run (whether it be by getting "rekt", retiring from a session, or completing the Peaks/Volcano boss jump); see here for a full list of items in this category.
As of full release, it is possible to see other players currently riding the same node that you are riding, due to the nature of how runs are generated (every few minutes the run seed globally changes).
Career-Plus Session
Career-Plus functions similarly to Career in most aspects, but differs in a few:
- There are 4 new regions - Desert, Jungle, Favela, and Glaciers
- There is a secret 5th region, the Ridges, accessible in the same manner as the Volcano.
- The mode requires the player to have earned 100,000 Reputation.
- There are no Team Nodes and no possibility of the game generating stormy or no-path nodes. (It is however possible to brute-force the game to generate them by modifying the Seed.)
Like Career, shortcuts to the last 3 regions have to be unlocked first. Unlike Career, there are no bonus worlds and no secret fifth region.
Freeride
Freeride will allow the player to generate a level by specifying various parameters. From there, the game will generate a Seed, and then build a level on that seed. Freeride can also be used to replay existing seeds that the player may have previously saved.
The player can enter any seed from any region; however, to generate levels in-game from a specific region, the player will need to unlock the shortcut to that region first. The Volcano is the only exception; its seeds cannot be entered and levels cannot be generated in-game until the player has cleared the Volcano boss jump.
For Bonus Worlds, they can be selected via the menu option if their objective was completed during a Career mode run; otherwise, the only way to play them is by inputting their seed.
The player can add as many Crew Members as they want to the in-game generator; however, they can only add crew members that they have previously selected in Career, and only crew members with a yellow icon will be reflected in the seed.
Daily Challenge
Daily Challenge works the same way as Career Session, except that this may only be attempted once, with every player in the world getting the same session. A new session begins at 00:00 GMT daily.
Multiplayer
Added upon launch, Multiplayer allows the player to see other players in-game, host lobbies, and join other players' lobbies.
Bike Parks
Bike Parks are a curated series of handcrafted modded maps, mostly created by Descenders' map designers Roan Albers and Spe.
Mods
Mods are a series of handcrafted modded maps, designed by the mapmaking community.
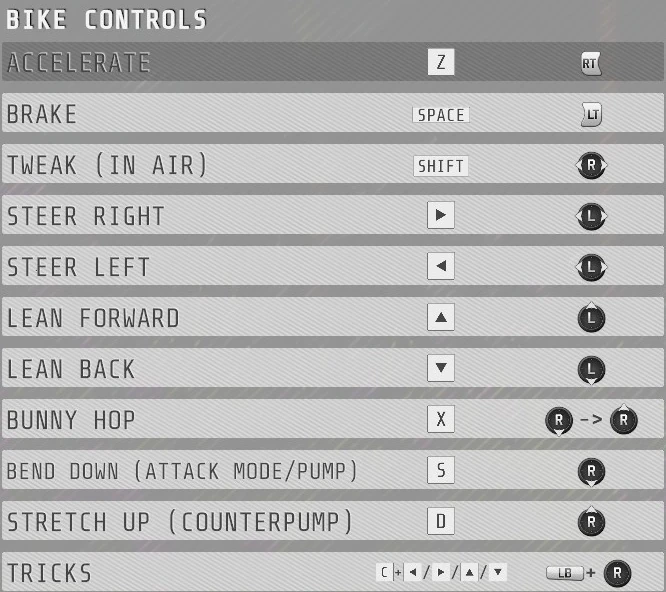
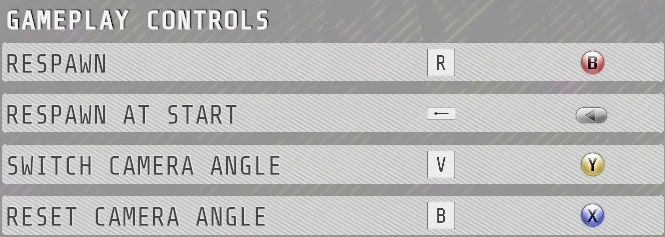
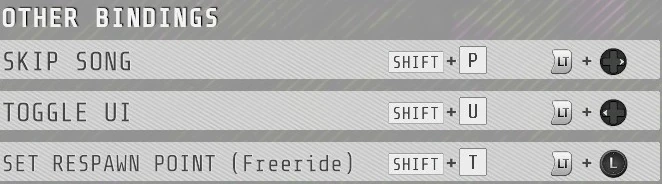
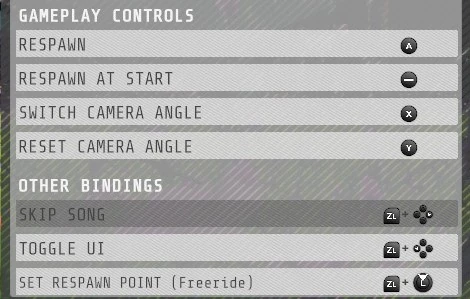
Controls
These are the bindings for Descenders. Only keyboard bindings are re-bindable. All bindings can be viewed in-game in the options menu, and are reproduced here to serve as an external resource.
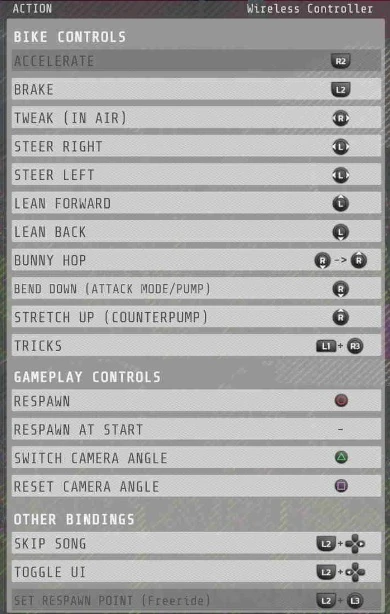
These are the bindings for the PS4 version:
These are the bindings for the Switch version:
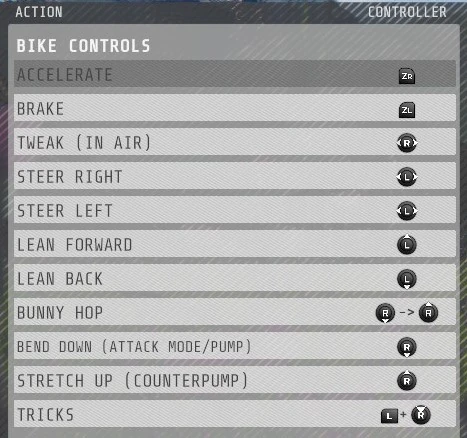
There are 5 types of tricks that can be done by pressing C (on keyboard), LB (on Xbox controller), or L1 (on PlayStation controller) - the directions listed indicate the direction in which to press the key/move the stick. For a full list, refer to the above page.
Not listed in the bindings in-game are the binds to use the handlebar item or say "Hey" (which can be toggled in the options menu). To do that, press "A" (keyboard)/press on the right stick (Xbox/PS4 controller/Switch).
General strategies
- Try and get used to the control scheme instead of focusing on Rep gain. The more control you have over your bike, the more Rep you will typically gain anyway.
- Play around with the camera view. Some points of view make the game easier on certain maps or modes, while others make it harder. For example, the First person view cam is absolutely horrible. Generally speaking, the best camera view is with the Drone, which gives you a third-person view and allows you to pre-empt incoming obstacles. However, in certain conditions First person view may actually help you, for example in a nighttime track.
- Not all crew members are equally useful. Here is a chart by Gardalice, sorting the crew members into various tiers with explanations, and this rule of thumb can be followed for both rep-gain and regular play. This isn't a be-all and end-all guide, due to everyone's differing playstyles, but it is useful if you want to improve your modifier selection.
| Crew Member | Tier | Explanation |
|---|---|---|
| Landing Impact | S (Priority for Survivability) | One of the most important crew members to have, which increases the amount of force your bike can take before bailing; combining with Pump Strength (or even just normal counter-pumping) allows you to survive jumps that you might normally bail from otherwise. |
| Fewer Obstacles | S | Less clutter, more chances to steer away from danger when going offroad. (Don't you just hate all those rocks?) Increases load time slightly, but that's a minor trade-off. |
| Speed Wobbles | S | Allows you to go faster without being thrown off course due to the micro-adjustments from the terrain. Great for lining up boss jumps, off-road maps, and just accelerating in general. It's easier to complete bonus objectives that require you to achieve a certain top speed with this crew member. |
| Prevent Modifiers | S in Career, Garbage in Career-Plus | Where's The Path modifiers on Canyon and Peaks can be incredibly dangerous; this prevents them outright. On Career-Plus, there are no storm or no-path nodes. |
| In Air Correction | A (Rep gain and maintaining speed) | Straightens your bike out faster, potentially saving you if your jump angle is awkward - especially if you do berm jumps. |
| Bunny Hop | A | Combine with Landing Impact to jump (and survive) massive leaps; combine with Spin Speed and Pump Strength for amazing stunts. |
| Spin Speed | A | Makes longer spin tricks like double backflip or 720 easier/faster to perform, yielding more Rep. |
| Tweak Speed | A | Not great on its own, but when combined with Spin Speed it becomes A-tier, as it allows for faster acceleration on spins. With enough speed, 1080s on regular jumps even become possible! |
| Smoother Curves | A | Straightens the curves and makes it easier to go fast. Combines well with Speed Wobbles and Extra Steepness, and also stacks with Less Curves. |
| Less Curves | A | Generates less (scary) curves and decreases loading time. Stacks with Smoother Curves to make Kinetic Trails into straight tracks, allowing for insane speeds. |
| Pump Strength | S with Landing Impact, A otherwise | Increases counter-pumping's potency by a bit. When combined with Landing Impact, allows you to survive huge jumps with ease if counter-pumping is timed right. On its own, helps you to build up speed when you slow down too much, maintaining your multiplier. |
| Wider Path | B (Optional modifiers) | Makes berms and curves higher, and is good up to the Canyon. On Peaks, this does not stack well with high steepness and curves levels, since the map may have a curve on a steep downhill section which can be dangerous to safely navigate. However, it does stack well with Less Curves/Smoother Curves, if combined with Extra Steepness. |
| Extra Steepness | B | Good for going fast and racking up high speed points. However, this does not stack well with Wider Path on Peaks. With Smoother Curves/Less Curves, this can result in insanely fast levels if the level has a Curves rating of 3-4. |
| Off-Road Friction | C (Technical) | Good for maintaining speed when off-road, but can be tricky to utilise. Great for speedruns where you just ignore the track and cycle as the crow flies. Stacks well with Extra Steepness, but is only really useful in Highlands and Forest, as going off-road on Canyon and Peaks is often a death sentence. |
| Fakie Balance | C | For beginning players, this is useful to save yourself when you accidentally find yourself biking backwards and need to jump + 180 to save yourself. For experienced players who are used to the default fakie controls, this helps them rack up big points easier. In terms of survivability though, this isn't that useful in the long run, as riding Canyon and Peaks backwards can prove to be fast and curvy. |
| Wheelie Balance | C | Increases the threshold for tipping over, meaning that you can stoppie non-stop while descending the Peaks. Wheelies themselves aren't great, but can still help you maintain your multiplier. |
| More Team Nodes | D (Daily) in Career, Garbage in Career-Plus | This crew member only comes into effect next world, so ideally it is best acquired when you are in the Highlands. Can help with daily challenges requiring max steepness tracks, minibosses, or rival sponsor nodes. Stacks well with Scout Nodes, making them easier to find. Team Nodes do not exist in Career-Plus. |
| Scout Nodes | D | Only good for finding bonus nodes easier, whether to beat them (Medic Camp, Team Node, Fire Node) or avoid certain ones (Helmet Cam). Stacks well with More Team Nodes. |
| Extra Stunts | D | Good for areas like Highlands where you can potentially generate extra minibosses, with the Castle giving you up to 3 miniboss clears (King of the Castle, To the Window, To the Wall). Bad for Forest and Peaks, especially if you are not used to the "bogey" stunts (rocks and logs in Forest, Enemy pits on Peaks). |
| Heavy Bail Threshold | Garbage | Raises the threshold for losing 2 lives and more from a bail, from 50 km/h to 60+ km/h. Your goal ideally is not to bail, and even if you do, you'll generally be going at speeds faster than 60 km/h in the Canyon and Peaks anyway. While more useful for newbies due to their relative inexperience, remember that this takes away one crew member slot that could be used to improve your rep gain. |
| More Checkpoints | Garbage | Your goal isn't to bail, so you should not really need these. |
| Show Compass | Garbage | Following the path ensures you won't get lost. If you get lost in Forest however, just ride the track downhill; the finish gate will be not too far off from where you end up. |